Ads 468x60px

Showing posts with label Android. Show all posts

Monday, April 15, 2013

How To Boot Into Recovery Without Key Combination


Recovery mode is an essential part of flashing custom ROMs, MODs, official updates and sometime Kernels. Almost every Android device be it smartphone, tablet or camera, always comes with some key combination that allow us easily enter into recovery mode. However, sometime many of use find difficulties to follow those key combination. That’s why today we come with two solution that can help you to enter into recovery without pressing that desired key combination.
The easiest of the two to boot into recovery mode is by using custom apps that can easily take you into recovery mode with few taps on screen. The other one required you to connect your device with computer and then enter adb command to boot into recovery. We will talk about it later, first we discuss about app.

How To Boot Into Recovery Mode on Any Android Device

  1. Download and install Quick Boot app from Google Play Store.
  2. Open the app and you will see four options that perform four different task – Reboot, Recovery, Bootloader and Power Off.
  3. Tap on Recovery and your Android device will reboot into Recovery Mode without manual effort.
The bad part is, this app require root access to perform this task. You must grant root access on SuperSU when asked. Quick Boot app really helpful when you feel problem pressing key combination or don’t know key combination to use advance Android features such as Recovery Mode.
Now, we will discuss another method which is boot using adb command. You must already set up ADB to use following command. You can follow our guide: How to install and set up ADB/Fastboot for Android Devices
Now, connect your Android powered device with computer and enter the following command in command window:
adb reboot recovery
To enter into Download Mode enter the following command:
adb reboot download
Reade more >>

How to install and set up ADB/Fastboot for Android Devices


Android Debug Bridge that also known as ADB is a tool to help developer to do more with their Android device. Though it especially designed for developer, average Android user sometime required it to complete task that can’t be done otherwise. ADB command or Fastboot commands often required when you want to install custom recovery, push a custom boot image or want to be on recovery mode that otherwise can’t. To access this command on your computer you must install Android SDK first. You can then able to run Adb and Fastboot commands.
Setting up ADB for your device in your computer can be done easily by installing the latest version of Android SDK and your phone USB drivers.
The following guide will help you to install and set up ADB for your Android device in your Windows computer.

Guide to install and set up ADB for Android Devices


1. Download the latest version of Android SDK (no matter whatever version your device running on).
2. Double click on downloaded .exe file to run the installer. You should change the default installation directory to C:android-sdk.
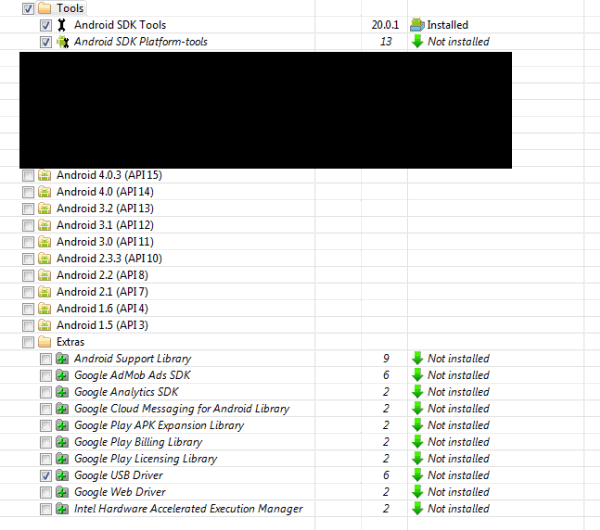
3. Now run SDK Manager from you start menu and check only the followings:
  • Android SDK Tools
  • Android SDK Platform Tools
  • Google USB Driver Package, Revision XX (Choose the highest revision number)

4. Install packages. Make sure to accept Questioned marked options when Choose Packages to Installwindow appear.


5. Now connect your phone with your computer using USB cable. Make sure USB debugging is on.
6. If this is your first connection then Windows will install the driver automatically. If not then you have to find and install your Android phone USB driver manually.
7. The process is completed here. Now its time to check if your ADB setup is ok or not. To do so, run command prompt (press Win+R and then type cmd before hitting OK button). Type cd c:android-sdkplatform-tools and hit enter to run the command.
8. Now type the following command in command prompt window then hit enter:
adb devices

You should see your device serial number in command prompt screen. If not, then you should reinstall your USB driver. If your device come with Fastboot support then type fastboot devices and you will see the same. You can now disconnect your mobile from computer if you no longer require a USB connection.

Reade more >>

How to Enable/Disable USB Transfer on Android Devices

USB transfer should be enabled first before you try to access your Android powered device storage in your computer. Good thing is, USB transfer is enabled out of the box but if due to some reason you want to disable it or re-enable it then we have a small guide for you. Enabling/Disabling USB transfer is very easy, just follow the below guide. Here you should note, you must have proper usb driver installed in your computer before you can access your phone data.


How to Enable/Disable USB Transfer on Android Mobile [Tested on Android 2.3.6]

1. Press Menu key in your home screen and then tap on Settings option.

2. A list of available options jump in front of you. Locate and tap on Applications option.

3. A few Applications related options will be shown in your screen. Navigate and tap on Developmentoption.

4. You will see 3 options in front of you – USB debugging, Stay awake and Allow mock locations. Every option comes with a check box. Tap on checkbox and it will turn into green (means activated). Make sure USB debugging is turned on when you want USB transfer else tap on it to deactivate the function.

Hope this small guide help you to solve some trick. We will talk on more about USB Data Transfer and Wi-Fi Data Transfer in our next articles.
If your device is running on Android 4.0 ICS or higher then got to: Settings –> Developer options and then check USB debugging.

If your device is running on Android 4.2 Jelly Bean or higher then you first require to enable that developer options menu before doing anything. To enable developer options go to: Settings –> About device and then tap on Build Number seven times repeatedly. Once you press it 5 times it gives you a quick note: “Press it two more times to be a developer!”. And, after tapping 7 times you will see ‘You are now a developer’ message. After that access developer options from setting and enable or disable USB debugging.
Reade more >>

Download Latest GApps or Google Apps


The Google Apps aka GApps is very important part of any Android system. Apps that included in this package are proprietary applications by Google. A manufacturer have to sign licensing deal with Google to preload it on their Android powered devices including smartphones, tablets and camera. Except Google Play Store all other applications that included in this package can also be downloaded from Google Play Store separately.
Google Apps aka GApps include apps like Google Play Store, GMail, Gtalk, Google Map, Google Calendar, Google Search, Google Voice, YouTube, Google Sync, Google Backup Transport, Car Home, Google Music, and Google Docs.
Now, the problem arrive when you use a custom ROM instead of official stock ROM. You have to install Google App pack separately as most custom ROM don’t comes with it, may be because of some legal reason. So, where you can get a supported separate GApps package? To save your time, in this page we listed out GApps download link as per Android Version. Though the download link divided as per CyanogenMod ROM version but the GApps work with most other ROMs. That’s why we advise you to see the Android version instead of ROM name. Remember, this package can only be flashed or installed using a custom recovery such as CWM recovery or TWRP recovery.

CyanogenMod 10.1.x
Android 4.2 – 4.2.1 – 4.2.2 – Jelly Bean
HDPI / MDPI / TINY / TEGRA: gapps-jb-20130301-signed.zip
CyanogenMod 10.0.x
Android 4.1.1 – 4.1.2 – Jelly Bean
HDPI / MDPI / TINY / TEGRA: gapps-jb-20121011-signed.zip
CyanogenMod 9.0.x
Android 4.0.3 – 4.0.4 – Ice Cream Sandwich
HDPI / MDPI / TINY / TEGRA: gapps-ics-20120429-signed.zip
CyanogenMod 7.1-2.x
Android 2.3.5 – 2.3.7 – Gingerbread
HDPI / MDPI / TINY / TEGRA: gapps-gb-20110828-signed.zip
Android 2.3.4 – Gingerbread
HDPI / MDPI / TINY / TEGRA: gapps-gb-20110613-signed.zip
CyanogenMod 7.0.x
Android 2.3.3 – Gingerbread
HDPI / MDPI / TINY / TEGRA: gapps-gb-20110307-signed.zip
Android 2.3.2 – Gingerbread
HDPI / MDPI / TINY / TEGRA: gapps-gb-20110120-signed.zip
CyanogenMod 6.0-1.x
Android 2.2.0 – 2.2.3
Reade more >>

How to Enable/Disable USB Transfer on Android Devices


USB transfer should be enabled first before you try to access your Android powered device storage in your computer. Good thing is, USB transfer is enabled out of the box but if due to some reason you want to disable it or re-enable it then we have a small guide for you. Enabling/Disabling USB transfer is very easy, just follow the below guide. Here you should note, you must have proper usb driver installed in your computer before you can access your phone data.

How to Enable/Disable USB Transfer on Android Mobile [Tested on Android 2.3.6]

1. Press Menu key in your home screen and then tap on Settings option.
usb-transfer-on-1
2. A list of available options jump in front of you. Locate and tap on Applications option.
usb-transfer-on-2
3. A few Applications related options will be shown in your screen. Navigate and tap on Developmentoption.
usb-transfer-on-3
4. You will see 3 options in front of you – USB debugging, Stay awake and Allow mock locations. Every option comes with a check box. Tap on checkbox and it will turn into green (means activated). Make sure USB debugging is turned on when you want USB transfer else tap on it to deactivate the function.
usb-transfer-on-4
Hope this small guide help you to solve some trick. We will talk on more about USB Data Transfer and Wi-Fi Data Transfer in our next articles.
If your device is running on Android 4.0 ICS or higher then got to: Settings –> Developer options and then check USB debugging.
android-4.2-developer-option
If your device is running on Android 4.2 Jelly Bean or higher then you first require to enable that developer options menu before doing anything. To enable developer options go to: Settings –> About device and then tap on Build Number seven times repeatedly. Once you press it 5 times it gives you a quick note: “Press it two more times to be a developer!”. And, after tapping 7 times you will see ‘You are now a developer’ message. After that access developer options from setting and enable or disable USB debugging.
Reade more >>

Download Android USB Drivers For Windows OS


Developer and users alike require USB driver if they want to access their Android powered device through computer (Windows / Mac / Linux). Without proper USB driver ADB or Fastboot commandwon’t work, you can’t access mobile storage in PC as well as can’t transfer data between mobile and computer.
Windows OS often install manufacturer specific USB driver as soon as you connect the device first time. However, it not always the case and sometime you do require manual installation. The list below helps you to download USB drivers either from manufacturer website or directly from a file hosted website.

From below given links you can either download the USB driver or PC Suite that comes with the driver.

Download Android USB Driver (Android Phone and Tablet) for Windows OS

Samsung: Download Samsung USB Drivers or Download Samsung KIES (comes with driver)
HTC: Download HTC USB Drivers (HTC Sync)
Motorola: Download Motorola USB Drivers (Motorola Device Manager)
ASUS: Download ASUS USB Drivers or Download ASUS PC Suite (comes with driver)
Huawei: Download HiSuite (drivers included)

Reade more >>

How to Check Battery Percentage in Android Phones


Checking battery percentage is very integral part of flashing ROM because if your Android powered device turn off during flashing then your phone may see a hard brick and then you have to send it to service center to fix thing. As smartphone require more power, your device may not on required battery percentage. So, how can we check the battery percentage without installing any app?
We will use Android inbuilt system to know our device remaining battery power. Knowing the remaining battery juice percentage is very much easy, just follow below procedure:

How to Check Battery Percentage in Android Phones (Tested on Android 4.1.1)

1. Go to Settings and then tap on About device. Now tap on Status. And you can then check out Battery level as shown in below image.
battery-check

How to Check Battery Percentage in Android Phones (Tested on Android 2.3.6)

1. Dial *#*#4636#*#* and it will come up with four options – Phone information, Battery information, Usage statistics and Wifi information.
android-battery-percentage-1
2. Tap on Battery information and it will show remaining battery level along with other related options including battery temperature, time since boot and battery health.
android-battery-percentage-2
If you wish you can also use third party apps such as Battery Widget, Battery Solo Widget or any other similar apps to know your battery usage percentage right on your home screen.

Reade more >>

A Complete Backup Solution For Android Devices


Backup is most essential part of data security. A best backup solution can help you to avoid problems that arrive due to corrupted data. In this article we will talk about best backup instruction or tips for Android devices (both smartphone and tablets). The good thing is, when you first started to use a new android device, you most likely login with your gmail id which eventually activate basic backup feature of Android system that can backup your contact, Wi-Fi settings, password and most other changes but can’t backup SMS and MMS that are stored in our mobile phone. Good thing is there are several powerful apps available out there in Google Play Store that comes with powerful data backup options that default backup feature can’t offer. If you own a rooted device then you can use even more powerful apps that offer much more data backup option. But, if you not own a rooted device then don’t worry, we are here to help you out. Here are few apps that you can use on a non-rooted device. Most of this apps are ad supported and you require to donate to remove those ads.
GO Backup Pro: This powerful little app can backup all your contacts,messages, system settings, GO launcher settings and apps. Its’ a simple, fast, stable and safe app to use in your android devices. This app for both rooted and non-rooted device. However, in rooted device Go Backup Pro can backup apps data as well as able to hide annoying app installation interface when restore apps. What’s more, it can sync your backup to Dropbox cloud storage. [Play Store Link]

APN Backup & Restore: Backing up APN setting is very important as this setting have your carrier instruction that allow you to send MMS as well as access Internet. APN Backup & Restore app help you here. However, this app unable to restore APN setting on Android 4.0 ICS and up due to restriction enabled in Android system. It still work great for other Android version users. There is a method mentioned by developer on app page through which you can restore data on Android 4.0 ICS and up but for that you require to have a rooted device. [Play Store Link]
JS Backup: This is indeed a complete Android backup app that fortunately is free. This application allows you to back up and recover your contacts, MMS, call history, text messages, calendars, bookmarks, system settings, shortcuts, alarms, dictionaries, applications, images, music, playlists, and videos. The app not only allow you to backup your data on SD card but also allow you to save it on cloud-based storage services (Dropbox, SugarSync, GoogleDocs). What’s more you can track your backup history online. [Play Store Link]
EFS Pro: This small little utility develop for Samsung users. The utility made for Windows system but if you know right tool then you can run it on Linux and Mac system. EFS Pro can backup and restore the infamous EFS Folder that all Android devices manufactured by Samsung comes with. This sensitive system folder contains Phone-specific information such as the IMEI (encrypted in the nv_data.bin), wireless devices MAC addresses, product code (also in the nv_data.bin), and much more. If this thing not handled properly, can turn your device completely useless as it will no longer be recognized by your carrier. [Download EFS Pro]
If you own a rooted Android device then use Titanium Backup [Play Store Link] or My Backup [Play Store Link]. If you can spend little money then go with pro version of Titanium Backup that comes with so many more features that complete your Android backup need.
If APN Backup and Restore app don’t work on your device then note down the setting manually. You can find the setting on Applications > Settings > Wireless and Network > Mobile Networks > Access Point Names. Also don’t forget to copy your device’s internal SD card data to external SD card.
Remember, you most likely lost all your device setting when you install a custom ROM or update your device with an official firmware. That’s why backing up data is very important.

Reade more >>
Related Posts Plugin for WordPress, Blogger...